
There’s something truly magical about Easter Egg Cheesecake Jars that takes me right back to the cozy kitchen of my beloved Mama Lou. Every Easter morning, the air would be filled with the scent of fresh citrus and sweet cream, mingling with the laughter of my sister Ouma and me as we eagerly awaited our special treats. These jars are more than just a dessert; they’re a little jar of nostalgia, tradition, and love. Today, I want to share with you this heartfelt recipe that brings those cherished memories to life, perfect for your family celebrations or any moment when you crave a touch of sweetness and warmth.
Why You’ll Love This Easter Egg Cheesecake Jars
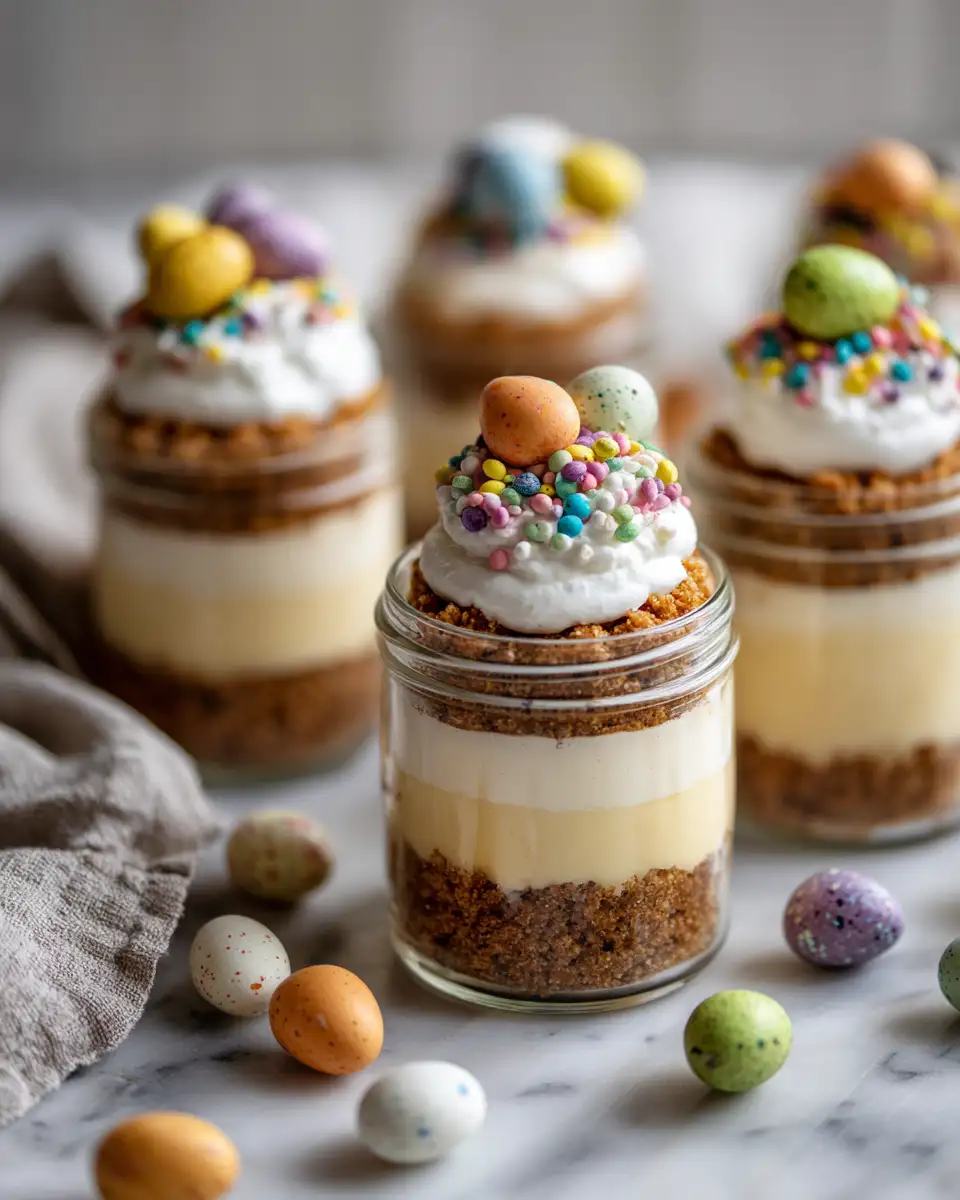
From the very first spoonful, Easter Egg Cheesecake Jars offer a delightful blend of creamy richness and playful charm. What I adore most about this recipe is how it captures the spirit of Easter while being surprisingly simple to make. Each jar is like a personal treasure chest, layered with velvety cheesecake filling, a crisp cookie crust, and topped with colorful Easter egg candies that instantly brighten the table.
This recipe holds a special place in my heart because it reminds me of those tender afternoons spent with Mama Lou, who always believed that desserts were meant to be both beautiful and comforting. She’d often say, “Sofia, food is the language of love.” And these jars speak volumes. They’re perfect for family gatherings, potlucks, or when you just want to slow down and savor a moment with those you love.
When I make these with Ouma, we always reminisce about the time Mama Lou let us “help” by carefully placing each Easter egg on top of the jars, our fingers sticky and faces glowing with pride. It’s this kind of joy and connection that makes these cheesecake jars truly unforgettable.
Ingredients You’ll Need for This Easter Egg Cheesecake Jars

- 1 1/2 cups graham cracker crumbs (or digestive biscuits for a richer flavor)
- 1/3 cup unsalted butter, melted
- 2 tablespoons granulated sugar
- 16 ounces cream cheese, softened
- 1/2 cup powdered sugar
- 1 teaspoon vanilla extract
- 1 cup heavy whipping cream
- 1/2 cup sour cream
- 1 teaspoon lemon zest (optional, adds a fresh touch)
- Colorful Easter egg candies or mini chocolate eggs, for garnish
- Fresh berries or edible flowers (optional, for extra spring charm)
If you’re looking for substitutions, you can swap the heavy cream for coconut cream for a dairy-free twist, or use gluten-free cookies for the crust to accommodate dietary needs. Mama Lou always encouraged me to adapt recipes to what I had on hand, turning every cooking session into a creative adventure.
Nutrition Facts
- Calories: Approximately 350 per jar (serving size: 1 jar)
- Protein: 6g
- Fat: 25g
- Carbohydrates: 25g
- Fiber: 1g
- Sugar: 18g
- Sodium: 180mg
These cheesecake jars are indulgent, no doubt, but they feel like a treat worth savoring, especially when shared with loved ones. I always remind myself, as Mama Lou did, that food is meant to nourish both body and soul — and sometimes that means savoring a little sweetness with gratitude. Learn more: Irresistible Peanut Butter Easter Eggs Your Taste Buds Will Love
Print
Delight Your Taste Buds with Irresistible Easter Egg Cheesecake Jars
Learn how to make delicious Easter Egg Cheesecake Jars. Easy recipe with step-by-step instructions.
- Total Time: 45 minutes
- Yield: 4 servings 1x
Ingredients
- 1 1/2 cups graham cracker crumbs (or digestive biscuits for a richer flavor)
- 1/3 cup unsalted butter, melted
- 2 tablespoons granulated sugar
- 16 ounces cream cheese, softened
- 1/2 cup powdered sugar
- 1 teaspoon vanilla extract
- 1 cup heavy whipping cream
- 1/2 cup sour cream
- 1 teaspoon lemon zest (optional, adds a fresh touch)
- Colorful Easter egg candies or mini chocolate eggs, for garnish
- Fresh berries or edible flowers (optional, for extra spring charm)
If you’re looking for substitutions, you can swap the heavy cream for coconut cream for a dairy-free twist, or use gluten-free cookies for the crust to accommodate dietary needs. Mama Lou always encouraged me to adapt recipes to what I had on hand, turning every cooking session into a creative adventure.
Instructions
- Begin by preparing the crust: In a medium bowl, combine the graham cracker crumbs, melted butter, and granulated sugar. Mix until the crumbs are evenly coated and sandy in texture. This step always reminds me of the times I’d sneak a quick taste of the crumbs with Ouma before pressing them into the jars – such a little guilty pleasure!
- Divide the crust mixture evenly among 6-8 small mason jars or dessert glasses. Press the crumbs firmly into the bottom to create a compact base. Place the jars in the refrigerator to chill while you prepare the filling.
- In a large mixing bowl, beat the softened cream cheese until smooth and creamy using a hand mixer or stand mixer. This step takes me back to the slow afternoons with Mama Lou, who taught me patience and care in every whisk.
- Add the powdered sugar and vanilla extract to the cream cheese, mixing until fully incorporated and silky.
- In a separate bowl, whip the heavy cream until soft peaks form. Gently fold the whipped cream and sour cream into the cream cheese mixture, being careful not to deflate the airiness. If using lemon zest, fold it in now for a subtle zing that brightens the flavor.
- Spoon or pipe the cheesecake filling over the crust layer in each jar, filling them nearly to the top. Smooth the surface with a small spatula or the back of a spoon.
- Cover the jars with lids or plastic wrap and refrigerate for at least 4 hours, preferably overnight. This chilling time allows the flavors to meld beautifully, much like the quiet moments Mama Lou cherished when letting her cakes rest.
- Just before serving, decorate each jar with colorful Easter egg candies or mini chocolate eggs. If you’re feeling extra festive, add fresh berries or edible flowers for a springtime touch that makes these jars truly shine.
One tip I learned from my sister Ouma is to chill the jars uncovered for 15 minutes before serving to let the cheesecake soften slightly. It’s those little details that make all the difference.
- Prep Time: 15 minutes
- Cook Time: 30 minutes
- Category: Main Dish
- Method: Cooking
- Cuisine: International
Steps to Create Your Easter Egg Cheesecake Jars
- Begin by preparing the crust: In a medium bowl, combine the graham cracker crumbs, melted butter, and granulated sugar. Mix until the crumbs are evenly coated and sandy in texture. This step always reminds me of the times I’d sneak a quick taste of the crumbs with Ouma before pressing them into the jars – such a little guilty pleasure!
- Divide the crust mixture evenly among 6-8 small mason jars or dessert glasses. Press the crumbs firmly into the bottom to create a compact base. Place the jars in the refrigerator to chill while you prepare the filling.
- In a large mixing bowl, beat the softened cream cheese until smooth and creamy using a hand mixer or stand mixer. This step takes me back to the slow afternoons with Mama Lou, who taught me patience and care in every whisk.
- Add the powdered sugar and vanilla extract to the cream cheese, mixing until fully incorporated and silky.
- In a separate bowl, whip the heavy cream until soft peaks form. Gently fold the whipped cream and sour cream into the cream cheese mixture, being careful not to deflate the airiness. If using lemon zest, fold it in now for a subtle zing that brightens the flavor.
- Spoon or pipe the cheesecake filling over the crust layer in each jar, filling them nearly to the top. Smooth the surface with a small spatula or the back of a spoon.
- Cover the jars with lids or plastic wrap and refrigerate for at least 4 hours, preferably overnight. This chilling time allows the flavors to meld beautifully, much like the quiet moments Mama Lou cherished when letting her cakes rest.
- Just before serving, decorate each jar with colorful Easter egg candies or mini chocolate eggs. If you’re feeling extra festive, add fresh berries or edible flowers for a springtime touch that makes these jars truly shine.
One tip I learned from my sister Ouma is to chill the jars uncovered for 15 minutes before serving to let the cheesecake soften slightly. It’s those little details that make all the difference.
Tips for Making the Best Easter Egg Cheesecake Jars
- Use room temperature cream cheese: This ensures a smooth, lump-free filling. I always take my cheese out a good half hour ahead, just like Mama Lou taught me.
- Don’t overmix the whipped cream: Fold it gently to keep the filling light and airy, which is the hallmark of a great cheesecake.
- Press the crust firmly: A compact crust base prevents it from crumbling when you dig in, which was a little trick Mama Lou swore by.
- Customize the toppings: Whether it’s pastel candies, sprinkles, or fresh fruit, make the jars your own. I love how Ouma and I always add a personal twist to every batch.
- Make ahead: These jars keep beautifully in the fridge and actually taste better after resting overnight, making them perfect for stress-free entertaining.
Serving Suggestions and Pairings

Easter Egg Cheesecake Jars shine on their own, but if you want to elevate your dessert table, here are a few ideas I cherish from family gatherings:
- Serve alongside a fresh spring salad with tangy vinaigrette to balance sweetness and freshness.
- Pair with a light, fruity white wine or a sparkling rosé for an elegant touch at brunch.
- Offer a side of homemade berry compote for guests who love an extra burst of fruitiness.
- Complement with a hot cup of herbal tea, like chamomile or mint, to keep the mood cozy and relaxed.
One Easter, I remember Mama Lou and I sipping tea while the sun warmed the porch, sharing stories as the jars slowly disappeared. Moments like those remind me that food is as much about connection as it is about flavor.
Storage and Reheating Tips
These cheesecake jars are best enjoyed chilled, so keep them refrigerated until you’re ready to serve. Here’s how I handle storage:
- Keep jars tightly sealed in the refrigerator for up to 4 days.
- Avoid freezing, as the texture of cheesecake can change and become grainy when thawed.
- If the filling firms up too much after refrigeration, let the jar sit at room temperature for 10-15 minutes before serving to soften slightly.
Whenever I make a batch, I label the jars with the date so that Ouma and I know exactly when they’re at their best. It’s a simple habit that keeps our kitchen running smoothly and our desserts perfect.
Frequently Asked Questions
What are the main ingredients for Easter Egg Cheesecake Jars?
The main ingredients for Easter Egg Cheesecake Jars include the items listed in our ingredients section above. Each ingredient plays a crucial role in achieving the perfect flavor and texture.
How long does it take to make Easter Egg Cheesecake Jars?
The total time to make Easter Egg Cheesecake Jars includes both preparation and cooking time. Check the recipe card above for exact timing details.
Can I make Easter Egg Cheesecake Jars ahead of time?
Yes, Easter Egg Cheesecake Jars can often be prepared in advance. Store it properly in an airtight container in the refrigerator and consume within the recommended timeframe.
What can I serve with Easter Egg Cheesecake Jars?
Easter Egg Cheesecake Jars pairs well with various sides and accompaniments. Consider the serving suggestions mentioned in the recipe for the best dining experience.
Is Easter Egg Cheesecake Jars suitable for special diets?
Depending on the ingredients used, Easter Egg Cheesecake Jars may be adapted for various dietary needs. Check the ingredients list and consider substitutions as needed for your dietary requirements.
Final Thoughts
Making Easter Egg Cheesecake Jars is like opening a little window to the past, filled with the warmth of Mama Lou’s kitchen and the laughter of my sister Ouma. This recipe is more than just a delicious treat—it’s a celebration of family, tradition, and the simple joy of sharing something homemade.
Whether you’re crafting these jars for an Easter gathering, a springtime party, or just because, I hope they bring as much happiness to your table as they have to mine. Remember, the best recipes are those sprinkled with love, patience, and a touch of nostalgia. So grab your mixing bowls, invite your loved ones into the kitchen, and create your own sweet memories with these Easter Egg Cheesecake Jars.