
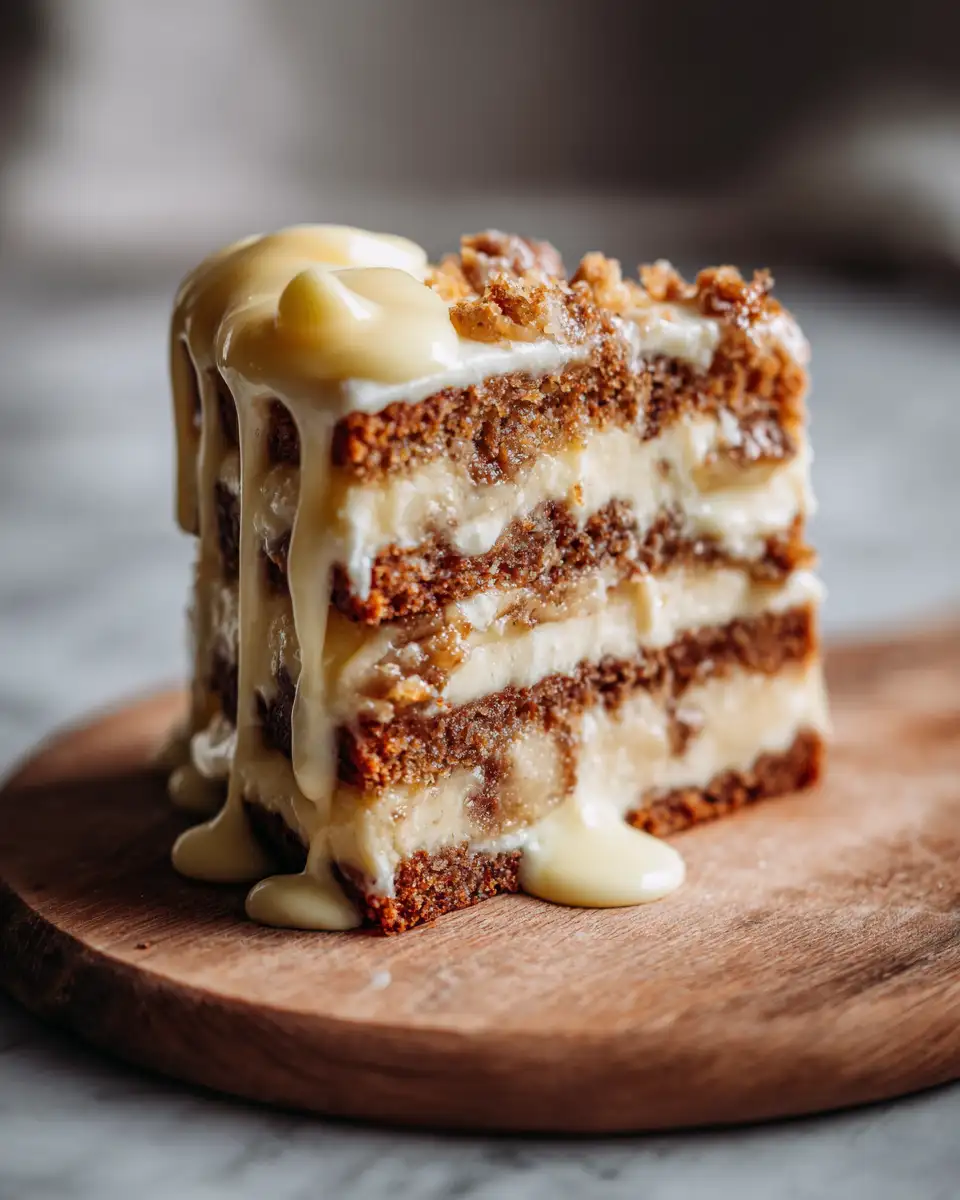
There’s something truly magical about a dessert with a creamy filling that melts into every bite. It feels like coming home after a long day, wrapped in the warmth of Mama Lou’s kitchen, where the air was always thick with love and the scent of slow-simmered custard. I remember sitting beside my sister Ouma, both of us eagerly waiting as Mama Lou carefully poured that luscious filling into the pastry shells, her hands steady and sure. Today, I want to share that same feeling with you—a recipe that’s as comforting as those childhood afternoons, full of nostalgia and the kind of sweetness that goes beyond sugar.
Table of Contents
Why You’ll Love This Creamy filling that melts into every bite.
From the first spoonful, this creamy filling envelopes your palate with a velvety richness that feels both indulgent and soothing. It’s the kind of texture that reminds me of Mama Lou’s gentle hands stirring the pot, coaxing out a perfect custard that never curdled or burned. What makes this recipe special is how the filling balances creaminess and lightness—never too heavy, never too thin, just the right kind of melt-in-your-mouth magic.
When I first made this recipe with Ouma, we were both surprised by how effortlessly it came together. It’s forgiving enough for beginners but sophisticated enough to impress even the most discerning dessert lovers. Plus, it’s endlessly versatile—perfect for tarts, pies, or even spooned over fresh fruit. Every bite carries the memory of family, tradition, and those quiet moments that Mama Lou gifted us through her cooking.
Ingredients You’ll Need for This Creamy filling that melts into every bite.

- 2 cups whole milk (or use half-and-half for extra richness)
- 4 large egg yolks
- 1/2 cup granulated sugar
- 1/4 cup cornstarch
- 1 teaspoon pure vanilla extract
- 2 tablespoons unsalted butter, cut into small pieces
- Pinch of salt
If you prefer a dairy-free version, almond milk or oat milk work beautifully, though the texture will be a bit lighter. For a touch of flavor, sometimes I swap the vanilla for a splash of orange blossom water, a trick I picked up watching Mama Lou experiment with her desserts on special occasions.
Nutrition Facts
- Calories: Approximately 220 per serving (about 1/2 cup)
- Protein: 6g
- Fat: 10g (mostly from butter and egg yolks)
- Carbohydrates: 25g
- Fiber: 0g
- Sugar: 20g
- Sodium: 50mg
These values reflect a traditional custard-style filling, which balances indulgence and nourishment. I always remind myself—just like Mama Lou did—that food is meant to be enjoyed, savored, and shared with loved ones.
Print
Indulge in the Creamy Filling That Melts into Every Bite
Learn how to make delicious Creamy filling that melts into every bite.. Easy recipe with step-by-step instructions.
- Total Time: 45 minutes
- Yield: 4 servings 1x
Ingredients
- 2 cups whole milk (or use half-and-half for extra richness)
- 4 large egg yolks
- 1/2 cup granulated sugar
- 1/4 cup cornstarch
- 1 teaspoon pure vanilla extract
- 2 tablespoons unsalted butter, cut into small pieces
- Pinch of salt
If you prefer a dairy-free version, almond milk or oat milk work beautifully, though the texture will be a bit lighter. For a touch of flavor, sometimes I swap the vanilla for a splash of orange blossom water, a trick I picked up watching Mama Lou experiment with her desserts on special occasions.
Instructions
- In a medium saucepan, gently heat the milk over medium heat until it just begins to simmer around the edges. Be careful not to let it boil—Mama Lou always said, “Patience, Sofia, the custard is a delicate dance.”
- While the milk is warming, whisk together the egg yolks, sugar, cornstarch, and salt in a separate bowl until smooth and pale in color. This mixture is the heart of your creamy filling.
- Slowly pour about half of the hot milk into the egg mixture, whisking constantly to temper the eggs and prevent scrambling. This step always made me feel like a magician, transforming simple ingredients into something extraordinary.
- Return the combined mixture to the saucepan and cook over medium-low heat, stirring constantly with a wooden spoon or heatproof spatula. Within 5-7 minutes, the custard will thicken—look for it to coat the back of your spoon, just like Mama Lou’s did.
- Remove from heat and stir in the butter and vanilla extract until smooth and glossy. This final touch is what gives the filling its luscious, melt-in-your-mouth finish.
- Transfer the creamy filling to a clean bowl, cover with plastic wrap pressed directly onto the surface to avoid a skin forming, and refrigerate for at least 2 hours before serving.
- When ready, spoon the filling into your chosen pastry shells, layer it over fresh berries, or swirl into your favorite cake for a surprise burst of creamy bliss.
- Prep Time: 15 minutes
- Cook Time: 30 minutes
- Category: Main Dish
- Method: Cooking
- Cuisine: International
Steps to Create Your Creamy filling that melts into every bite.
- In a medium saucepan, gently heat the milk over medium heat until it just begins to simmer around the edges. Be careful not to let it boil—Mama Lou always said, “Patience, Sofia, the custard is a delicate dance.”
- While the milk is warming, whisk together the egg yolks, sugar, cornstarch, and salt in a separate bowl until smooth and pale in color. This mixture is the heart of your creamy filling.
- Slowly pour about half of the hot milk into the egg mixture, whisking constantly to temper the eggs and prevent scrambling. This step always made me feel like a magician, transforming simple ingredients into something extraordinary.
- Return the combined mixture to the saucepan and cook over medium-low heat, stirring constantly with a wooden spoon or heatproof spatula. Within 5-7 minutes, the custard will thicken—look for it to coat the back of your spoon, just like Mama Lou’s did.
- Remove from heat and stir in the butter and vanilla extract until smooth and glossy. This final touch is what gives the filling its luscious, melt-in-your-mouth finish.
- Transfer the creamy filling to a clean bowl, cover with plastic wrap pressed directly onto the surface to avoid a skin forming, and refrigerate for at least 2 hours before serving.
- When ready, spoon the filling into your chosen pastry shells, layer it over fresh berries, or swirl into your favorite cake for a surprise burst of creamy bliss.
Tips for Making the Best Creamy filling that melts into every bite.
One of the most important lessons Mama Lou taught me was to never rush custard. Stirring patiently and keeping the heat low are key to that perfectly smooth texture. I’ve lost count of how many times Ouma and I stood side by side, whispering secrets about the right consistency, learning that it’s as much about feeling as it is about sight. Learn more: Indulge in the Decadence of Elegant Cherry Amaretto Tiramisu
Here are some of my favorite tips:
- Use fresh eggs at room temperature—cold eggs can shock the hot milk and cause lumps.
- Whisk constantly during cooking to prevent the custard from sticking or burning.
- For an extra velvety texture, strain the filling through a fine-mesh sieve before chilling.
- Don’t skip the butter—it adds richness and a silky mouthfeel that’s worth every calorie.
- If your custard is too thick after chilling, gently whisk in a splash of milk to bring it back to life.
Serving Suggestions and Pairings
This creamy filling is a true chameleon in the kitchen. I often think back to the afternoons when Mama Lou would serve it simply with fresh fruit—perhaps ripe strawberries or tart raspberries picked from our garden. It’s a combination that never fails to bring smiles to the table.
Here are some ideas to make your dessert experience even more memorable:
- Fill crisp tart shells and top with a sprinkle of toasted almonds or a drizzle of honey.
- Layer between sponge cake layers with fresh berries for a classic trifle.
- Use as a dip for sliced apples or pears for a light, elegant snack.
- Spread over warm crepes and fold gently for a simple yet sophisticated treat.
- Top with a dusting of cinnamon or nutmeg to evoke those cozy, fall-inspired memories from my childhood kitchen.
Storage and Reheating Tips
Like any custard, this creamy filling is best enjoyed fresh, but I understand that sometimes life gets busy—Ouma and I certainly know that well! You can store it in an airtight container in the refrigerator for up to 3 days. Always keep the plastic wrap pressed to the surface to avoid a thick skin forming.
If you need to reheat, do so gently over low heat, stirring constantly, or warm it briefly in the microwave in short bursts. Adding a splash of milk before reheating can help restore that silky texture. Just remember, custard is delicate—treat it with care, just like Mama Lou taught me.
Frequently Asked Questions
What are the main ingredients for Creamy filling that melts into every bite.?
The main ingredients for Creamy filling that melts into every bite. include the items listed in our ingredients section above. Each ingredient plays a crucial role in achieving the perfect flavor and texture.
How long does it take to make Creamy filling that melts into every bite.?
The total time to make Creamy filling that melts into every bite. includes both preparation and cooking time. Check the recipe card above for exact timing details.
Can I make Creamy filling that melts into every bite. ahead of time?
Yes, Creamy filling that melts into every bite. can often be prepared in advance. Store it properly in an airtight container in the refrigerator and consume within the recommended timeframe.
What can I serve with Creamy filling that melts into every bite.?
Creamy filling that melts into every bite. pairs well with various sides and accompaniments. Consider the serving suggestions mentioned in the recipe for the best dining experience.
Is Creamy filling that melts into every bite. suitable for special diets?
Depending on the ingredients used, Creamy filling that melts into every bite. may be adapted for various dietary needs. Check the ingredients list and consider substitutions as needed for your dietary requirements.
Final Thoughts
Making this creamy filling that melts into every bite is more than just a recipe—it’s a bridge to the past, a way to hold onto the golden moments I shared with Mama Lou and Ouma. Every spoonful carries the warmth of family gatherings, the quiet joy of simple pleasures, and the timeless art of cooking with love.
“Food is the thread that weaves our stories together,” Mama Lou used to say, and with this filling, I feel that thread wrap around me tightly, inviting you to create your own stories, one creamy bite at a time.
Whether you’re baking for a special occasion or simply craving a comforting treat, this recipe will be your steadfast companion. Embrace the process, savor the flavors, and remember that the best dishes always come from the heart.