
Chocolate dump cake recipe tips might sound basic, but trust me, there’s an art to making this effortless dessert truly shine. Growing up, Mama Lou’s kitchen smelled like a chocolate wonderland whenever she whipped up her signature dump cake. I remember sitting beside her, watching her pour ingredients straight from the cans into the pan like magic, no fuss, just love in every layer. Those moments with her—and later with my sister Ouma—made this simple cake feel like a family treasure.
Dump cakes get a bad rap sometimes—people think they’re shortcuts or second-best desserts. But with a few tweaks and heartfelt attention, this cake can become your go-to for rich flavor and easy prep. I’m sharing the best tips I’ve learned from my kitchen adventures to help you make a chocolate dump cake that’s anything but ordinary.
Table of Contents
Why Chocolate Dump Cake Deserves More Love
First off, let’s clear the air. A dump cake is a layered dessert where you “dump” canned or pre-prepared ingredients together, bake it, and get a luscious, cobbler-like result. It’s the kind of recipe that suits busy days, last-minute guests, or those moments when you want something sweet without the drama.
But here’s the catch: just dumping ingredients isn’t enough. Without some love and smart choices, it can turn out soggy, bland, or too sweet. The magic lies in balancing textures and flavors, and that’s exactly what Mama Lou taught me.
Top Tips for a Perfect Chocolate Dump Cake

1. Choose Quality Ingredients
Since dump cakes rely heavily on canned and packaged ingredients, picking good quality stuff makes a huge difference. I always opt for canned fruit or pie filling with natural flavors—no artificial syrup bombs. When it comes to chocolate, use the best cake mix and cocoa powder you can find; your taste buds will thank you.
2. Layering Matters
Don’t just dump and go! Start with a layer of fruit or pie filling at the bottom, then sprinkle dry cake mix evenly over it. Mama Lou always said spreading the cake mix in an even layer prevents clumps and ensures every bite is perfectly cakey. Finally, dot the top with pats of butter to help the crust get golden and crisp.
Print
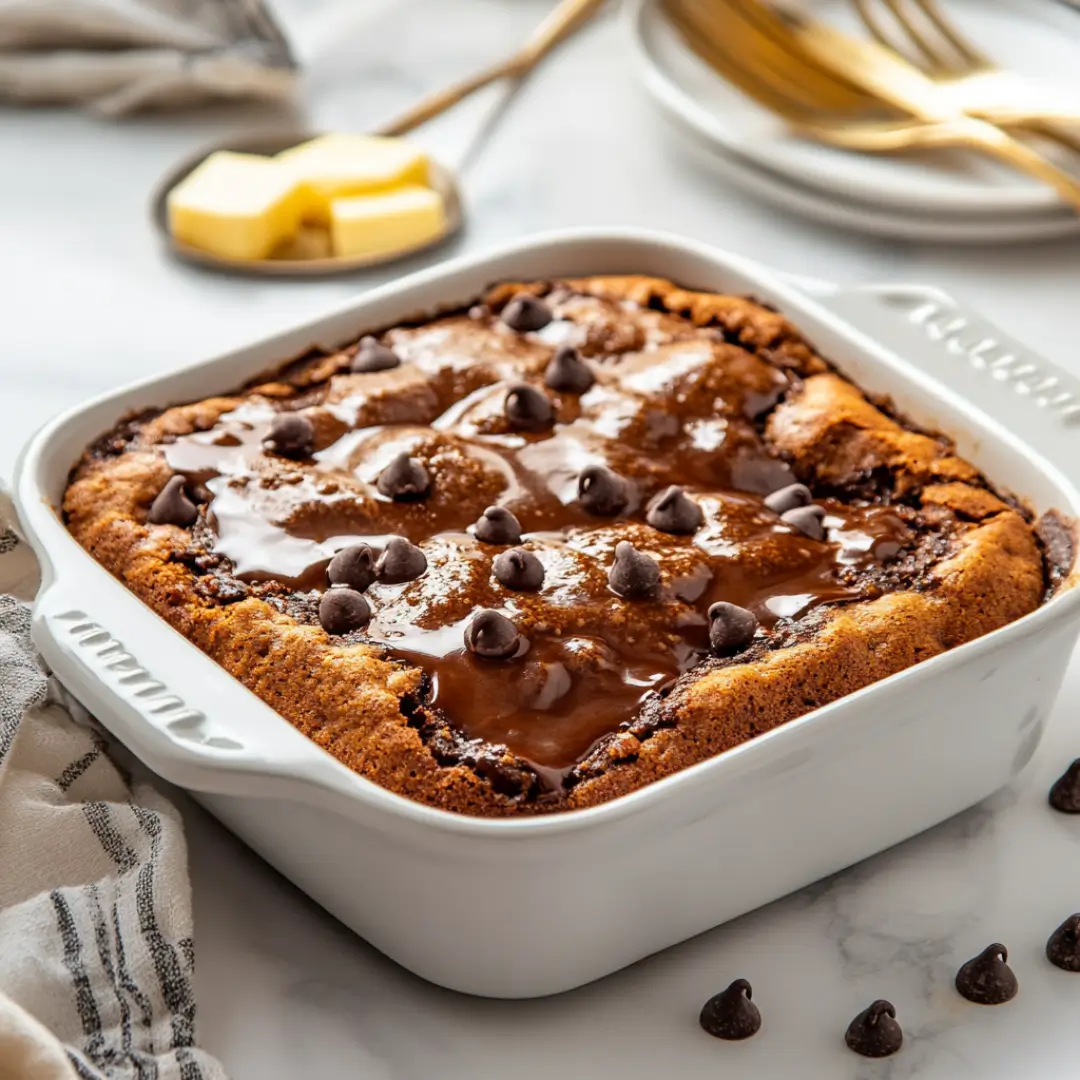
Chocolate Dump Cake Recipe Tips: Simple, Sweet, and Full of Memories
This chocolate dump cake is a rich, gooey dessert that brings back warm memories from Mama Lou’s kitchen. Made with just a few pantry staples, it’s the easiest way to turn everyday ingredients into a nostalgic, chocolatey treat—no mixer required.
- Total Time: 45 minutes
- Yield: 12 servings 1x
Ingredients
Base Ingredients
- 1 can (21 oz) cherry pie filling
- 1 box (15.25 oz) chocolate cake mix
- 1/2 cup (1 stick) unsalted butter, sliced into pats
Optional Add-Ins
- 1/2 cup semi-sweet chocolate chips
- 1/2 cup chopped pecans or walnuts
- 1/4 tsp cinnamon
- 1/4 tsp espresso powder
Instructions
- Preheat and prep: Preheat your oven to 350°F (175°C). Lightly grease a 9×13 inch baking dish.
- Add the filling: Pour the cherry pie filling into the baking dish and spread it out evenly.
- Sprinkle the cake mix: Evenly sprinkle the dry chocolate cake mix over the filling—don’t mix it in!
- Add butter: Distribute the pats of butter over the top of the cake mix, covering as much surface as possible.
- Optional toppings: Sprinkle chocolate chips, nuts, or spices over the top if using. This is where you can add your own twist.
- Bake: Bake for 35–40 minutes or until the top looks golden and bubbly and the center is set.
- Cool and serve: Let it cool for 10–15 minutes. Serve warm, preferably with ice cream or whipped cream.
Notes
- Use real butter for the best flavor and texture. Margarine won’t give the same richness.
- Try swapping cherry pie filling for raspberry or strawberry for a fruity twist.
- If your cake mix looks dry mid-bake, drizzle a bit of melted butter or milk over dry spots.
- Make it nut-free by skipping the pecans or swapping them with shredded coconut.
- Looking for a lighter version? Try our White Chocolate Cake instead.
- Prep Time: 5 minutes
- Cook Time: 40 minutes
- Category: Desserts
- Method: Baking
- Cuisine: American
- Diet: Vegetarian
Nutrition
- Serving Size: 1 square
- Calories: 320
- Sugar: 27g
- Sodium: 340mg
- Fat: 14g
- Saturated Fat: 8g
- Unsaturated Fat: 5g
- Trans Fat: 0g
- Carbohydrates: 48g
- Fiber: 2g
- Protein: 2g
- Cholesterol: 30mg
3. Butter Is Your Best Friend
Speaking of butter, don’t skimp here. Butter melts and soaks into the cake mix, creating that irresistible crust with a slight crunch. I prefer real butter over margarine or oil-based substitutes. If you want a twist, try melting the butter first—it helps coat the cake mix better and speeds up crisping.
4. Don’t Overbake
One of the biggest mistakes is baking too long. Overbaking dries the cake out and turns the fruit mushy. Keep an eye on it—when the edges are bubbling and the top is golden brown, you’re done. A toothpick inserted near the edge should come out with moist crumbs but no raw batter.
5. Add Texture and Contrast
To prevent the cake from being all soft, add chopped nuts, chocolate chips, or even shredded coconut between the layers. I love sprinkling toasted pecans on top before baking—Ouma swore by it, and I agree it brings a lovely crunch and flavor depth.
6. Spice It Up
A pinch of cinnamon, a dash of espresso powder, or a hint of cayenne pepper can elevate the chocolate flavor in subtle, surprising ways. Mama Lou used to sneak in cinnamon for warmth, and sometimes I add a splash of vanilla extract or almond extract to the fruit layer for an extra pop.
My Favorite Chocolate Dump Cake Twist
One of my favorite memories is when Ouma came to visit and we decided to make the dump cake with fresh raspberries instead of canned fruit. We added white chocolate chips along with semi-sweet ones and swapped out half the butter for browned butter. The result? A rich, nutty, tangy cake that felt fancy but took hardly any effort. Trust me, experimenting with add-ins keeps this humble dessert exciting.
Serving and Storing Tips
This cake tastes amazing warm, especially with a scoop of vanilla ice cream or a dollop of whipped cream. If you’re saving leftovers, cover tightly and refrigerate—dump cake keeps well for up to three days. Reheat gently in the oven or microwave to revive the melty goodness before serving again.

Why This Simple Cake Feels Like Home
What makes a chocolate dump cake more than just a quick dessert is the memories baked into it. For me, it’s about sitting with Mama Lou in her cozy kitchen, Ouma’s laughter filling the room, and the comfort of something warm and sweet after a long day. It reminds me that sometimes the simplest recipes are the richest—not just in flavor, but in heart.
Conclusion: Make This Cake Your Own
Chocolate dump cake might sound like a no-brainer, but it deserves a little attention to become unforgettable. Choose quality ingredients, layer thoughtfully, and don’t forget to add your own twist. Whether it’s a family dinner, a potluck, or a solo treat, this cake brings ease and warmth to any table.
So yeah, if you’ve been sleeping on this, now’s the time to wake up and give it a shot. Trust me—you’ll thank yourself later.