
There’s something truly magical about Homemade Filipino Chorizo that takes me straight back to the kitchen of Mama Lou, where the air was thick with the sweet, smoky aroma of spices and freshly ground pork. It wasn’t just about the flavors; it was about the stories Mama Lou shared as she stuffed each casing by hand, her hands steady but gentle. I still remember sneaking tastes with my sister Ouma, our fingers sticky with the rich marinade, giggling as Mama Lou caught us in the act. Making chorizo at home is more than a recipe; it’s a way to connect with tradition, family, and love. I’m thrilled to share this recipe with you, hoping you’ll feel a bit of that warmth and nostalgia with every bite.
Table of Contents
Why You’ll Love This Homemade Filipino Chorizo
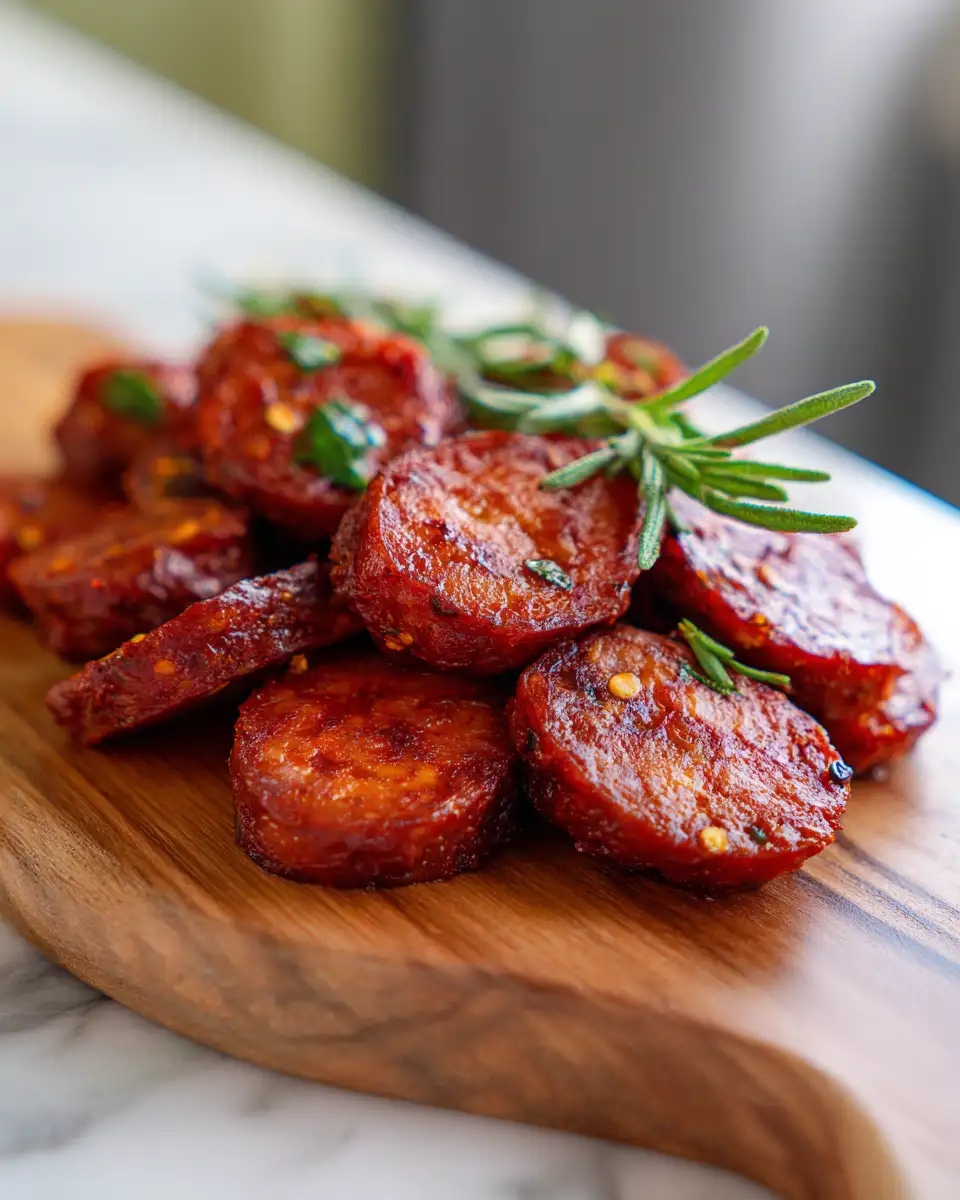
Homemade Filipino Chorizo is a treasure of flavor wrapped in a simple sausage casing, but what truly makes it special is the blend of sweet, tangy, and savory notes that dance on your tongue. Unlike store-bought versions, making chorizo at home means you control the quality of ingredients and the balance of spices. For me, it’s a labor of love—a ritual that reminds me of Mama Lou’s kitchen and the afternoons spent with Ouma, learning the art of patience and perfection. This chorizo is juicy, slightly sweet from the muscovado sugar, and bright with a hint of vinegar, making it a perfect companion to garlic rice and a sunny-side-up egg, just like we enjoyed on lazy Sunday mornings.
Another reason you’ll adore this recipe is its versatility. Whether you’re adding it to your breakfast plate, folding it into a pasta sauce, or simply enjoying it grilled and sliced, Homemade Filipino Chorizo brings a burst of authentic flavor that’s hard to beat. It’s comfort food that carries history in every bite.
Ingredients You’ll Need for This Homemade Filipino Chorizo

- 2 pounds ground pork (preferably with 20-30% fat for juiciness)
- 1/2 cup white vinegar (you can substitute with apple cider vinegar for a milder tang)
- 1/2 cup muscovado sugar (dark brown sugar works, but muscovado adds depth)
- 4 cloves garlic, minced
- 1 tablespoon kosher salt
- 2 teaspoons ground black pepper
- 1 tablespoon paprika (for color and subtle smokiness)
- 1 teaspoon dried oregano
- 1/2 teaspoon chili flakes (optional, for a gentle heat)
- 1/4 cup soy sauce (for umami and saltiness)
- Sausage casings (natural pork casings or collagen casings, soaked and rinsed)
Growing up, Mama Lou always swore by using muscovado sugar because it added a caramel-like richness that ordinary brown sugar couldn’t match. My sister Ouma and I would fight over who got to stir the mixture, marveling at how simple ingredients transformed into something so special.
Nutrition Facts
- Calories: Approximately 280 per 3-ounce serving
- Protein: 18g
- Fat: 22g (mostly from pork fat, which adds flavor and moisture)
- Carbohydrates: 4g
- Fiber: 0g
- Sugar: 3g (from muscovado sugar and vinegar)
- Sodium: 600mg (from salt and soy sauce)
Considering the richness of the pork and the sweet-tangy balance, this chorizo is indulgent but perfectly balanced when enjoyed as part of a hearty breakfast or shared with loved ones. I always keep portion sizes in mind, especially when pairing it with steamed rice and fresh vegetables.
Print
Master the Flavor: How to Make Irresistible Homemade Filipino Chorizo
Learn how to make delicious Homemade Filipino Chorizo. Easy recipe with step-by-step instructions.
- Total Time: 45 minutes
- Yield: 4 servings 1x
Ingredients
- 2 pounds ground pork (preferably with 20-30% fat for juiciness)
- 1/2 cup white vinegar (you can substitute with apple cider vinegar for a milder tang)
- 1/2 cup muscovado sugar (dark brown sugar works, but muscovado adds depth)
- 4 cloves garlic, minced
- 1 tablespoon kosher salt
- 2 teaspoons ground black pepper
- 1 tablespoon paprika (for color and subtle smokiness)
- 1 teaspoon dried oregano
- 1/2 teaspoon chili flakes (optional, for a gentle heat)
- 1/4 cup soy sauce (for umami and saltiness)
- Sausage casings (natural pork casings or collagen casings, soaked and rinsed)
Growing up, Mama Lou always swore by using muscovado sugar because it added a caramel-like richness that ordinary brown sugar couldn’t match. My sister Ouma and I would fight over who got to stir the mixture, marveling at how simple ingredients transformed into something so special.
Instructions
- Prepare your workspace by thoroughly cleaning and sanitizing all surfaces. If you’re using natural casings, soak them in warm water for at least 30 minutes, then rinse inside and out.
- In a large bowl, combine the ground pork with the minced garlic, muscovado sugar, salt, black pepper, paprika, oregano, chili flakes (if using), vinegar, and soy sauce.
- Mix everything together using your hands or a sturdy spoon until fully incorporated. I find that using my hands helps me feel the texture—Mama Lou always said the right consistency is key to juicy chorizo.
- Cover the mixture and refrigerate for at least 4 hours, preferably overnight. This allows the flavors to meld beautifully, just like Mama Lou’s secret technique.
- Once marinated, set up your sausage stuffer or funnel. Carefully thread the casing onto the nozzle, leaving a few inches loose at the end for tying.
- Fill the casing with the pork mixture, gently pressing to avoid air pockets. Don’t overstuff—this can cause the casing to burst during cooking.
- Twist the sausage every 4-5 inches to form individual links, then tie the ends securely with kitchen twine.
- If you prefer not to use casings, you can shape the mixture into patties or logs for frying instead.
- To cook, heat a skillet over medium heat. Cook the chorizo links or patties for about 6-8 minutes per side, turning until browned and cooked through (internal temperature should reach 160°F).
- Serve warm with garlic rice and a fried egg, or use as a flavorful addition to your favorite dishes.
I remember the first time I made chorizo with Ouma. We laughed as the casing slipped off the nozzle, turning our kitchen into a small mess. But that day taught me patience and the joy of making something from scratch that tastes better than anything store-bought.
- Prep Time: 15 minutes
- Cook Time: 30 minutes
- Category: Main Dish
- Method: Cooking
- Cuisine: International
Steps to Create Your Homemade Filipino Chorizo
- Prepare your workspace by thoroughly cleaning and sanitizing all surfaces. If you’re using natural casings, soak them in warm water for at least 30 minutes, then rinse inside and out.
- In a large bowl, combine the ground pork with the minced garlic, muscovado sugar, salt, black pepper, paprika, oregano, chili flakes (if using), vinegar, and soy sauce.
- Mix everything together using your hands or a sturdy spoon until fully incorporated. I find that using my hands helps me feel the texture—Mama Lou always said the right consistency is key to juicy chorizo.
- Cover the mixture and refrigerate for at least 4 hours, preferably overnight. This allows the flavors to meld beautifully, just like Mama Lou’s secret technique.
- Once marinated, set up your sausage stuffer or funnel. Carefully thread the casing onto the nozzle, leaving a few inches loose at the end for tying.
- Fill the casing with the pork mixture, gently pressing to avoid air pockets. Don’t overstuff—this can cause the casing to burst during cooking.
- Twist the sausage every 4-5 inches to form individual links, then tie the ends securely with kitchen twine.
- If you prefer not to use casings, you can shape the mixture into patties or logs for frying instead.
- To cook, heat a skillet over medium heat. Cook the chorizo links or patties for about 6-8 minutes per side, turning until browned and cooked through (internal temperature should reach 160°F).
- Serve warm with garlic rice and a fried egg, or use as a flavorful addition to your favorite dishes.
I remember the first time I made chorizo with Ouma. We laughed as the casing slipped off the nozzle, turning our kitchen into a small mess. But that day taught me patience and the joy of making something from scratch that tastes better than anything store-bought. Learn more: Irresistible Spanish Churro Pancakes That Will Sweeten Your Morning
Tips for Making the Best Homemade Filipino Chorizo
- Choose fresh pork: For the juiciest chorizo, use pork with a good fat ratio (20-30%). I often visit the local market early morning to get the freshest cuts, just like Mama Lou did.
- Marinate overnight: Allow the flavors to develop fully by refrigerating the mixture overnight. This step is crucial and worth the wait.
- Don’t overstuff the casing: It’s tempting to fill every inch, but leaving a little room prevents bursting while cooking.
- Use muscovado sugar: Its deep, molasses-like flavor makes all the difference. If unavailable, dark brown sugar is a decent substitute.
- Experiment with heat: Adjust chili flakes to your preference. Mama Lou’s chorizo was always mild, but Ouma and I loved adding a little kick.
- Store extras properly: Freeze any unused chorizo in airtight bags. This preserves the flavors and texture beautifully.
- Cook slowly: Patience is key. Cooking over medium heat ensures the chorizo cooks through without burning on the outside.
Serving Suggestions and Pairings

When I think of Homemade Filipino Chorizo, I immediately picture a plate of freshly steamed garlic rice topped with a sunny-side-up egg, the yolk melting into the rice and mingling perfectly with the chorizo’s bold flavors. This is the breakfast that Mama Lou served us on special weekends, and it’s a tradition I continue to share with my own family.
Beyond breakfast, chorizo pairs wonderfully with sautéed greens like kangkong or spinach, adding a smoky depth to vegetable dishes. You can also crumble it into pasta sauces or use it as a flavorful filling for savory empanadas. One of my favorite memories is sharing chorizo-stuffed lumpia with Ouma during our family gatherings—simple, yet unforgettable.
- Garlic fried rice and fried eggs for a classic breakfast
- Steamed white rice with sautéed greens
- Mixed into pasta sauces or tomato-based dishes
- As a filling for lumpia or empanadas
- Grilled and served with pickled vegetables (atchara)
Storage and Reheating Tips
Just like Mama Lou taught me, proper storage is essential to keep your Homemade Filipino Chorizo fresh and flavorful. If you’re not cooking it right away, keep the raw chorizo in the fridge for up to 2 days. For longer storage, freeze the chorizo links wrapped tightly in plastic wrap and placed in a freezer-safe bag for up to 3 months.
When reheating cooked chorizo, I prefer to gently warm it in a skillet over low heat. This helps retain its moisture and texture without drying out. You can also reheat it in the oven at 325°F for about 10-15 minutes, covered loosely with foil.
“Always treat your chorizo with care—it deserves the same love and attention as any family recipe passed down through generations.”
Frequently Asked Questions
What are the main ingredients for Homemade Filipino Chorizo?
The main ingredients for Homemade Filipino Chorizo include the items listed in our ingredients section above. Each ingredient plays a crucial role in achieving the perfect flavor and texture.
How long does it take to make Homemade Filipino Chorizo?
The total time to make Homemade Filipino Chorizo includes both preparation and cooking time. Check the recipe card above for exact timing details.
Can I make Homemade Filipino Chorizo ahead of time?
Yes, Homemade Filipino Chorizo can often be prepared in advance. Store it properly in an airtight container in the refrigerator and consume within the recommended timeframe.
What can I serve with Homemade Filipino Chorizo?
Homemade Filipino Chorizo pairs well with various sides and accompaniments. Consider the serving suggestions mentioned in the recipe for the best dining experience.
Is Homemade Filipino Chorizo suitable for special diets?
Depending on the ingredients used, Homemade Filipino Chorizo may be adapted for various dietary needs. Check the ingredients list and consider substitutions as needed for your dietary requirements.
Final Thoughts
Making Homemade Filipino Chorizo is more than just cooking; it’s a tradition that connects us to the past and brings us closer to those we love. Every time I prepare this recipe, I’m reminded of Mama Lou’s gentle hands guiding mine, and the laughter Ouma and I shared as we learned to craft something so simple yet so profound. This chorizo carries the soul of Filipino home cooking—sweet, savory, comforting, and full of heart.
I hope this recipe inspires you to slow down, savor the process, and create your own family memories. Whether you’re a seasoned cook or new to Filipino cuisine, making chorizo at home is a rewarding experience that fills your kitchen with warmth and your table with joy.