

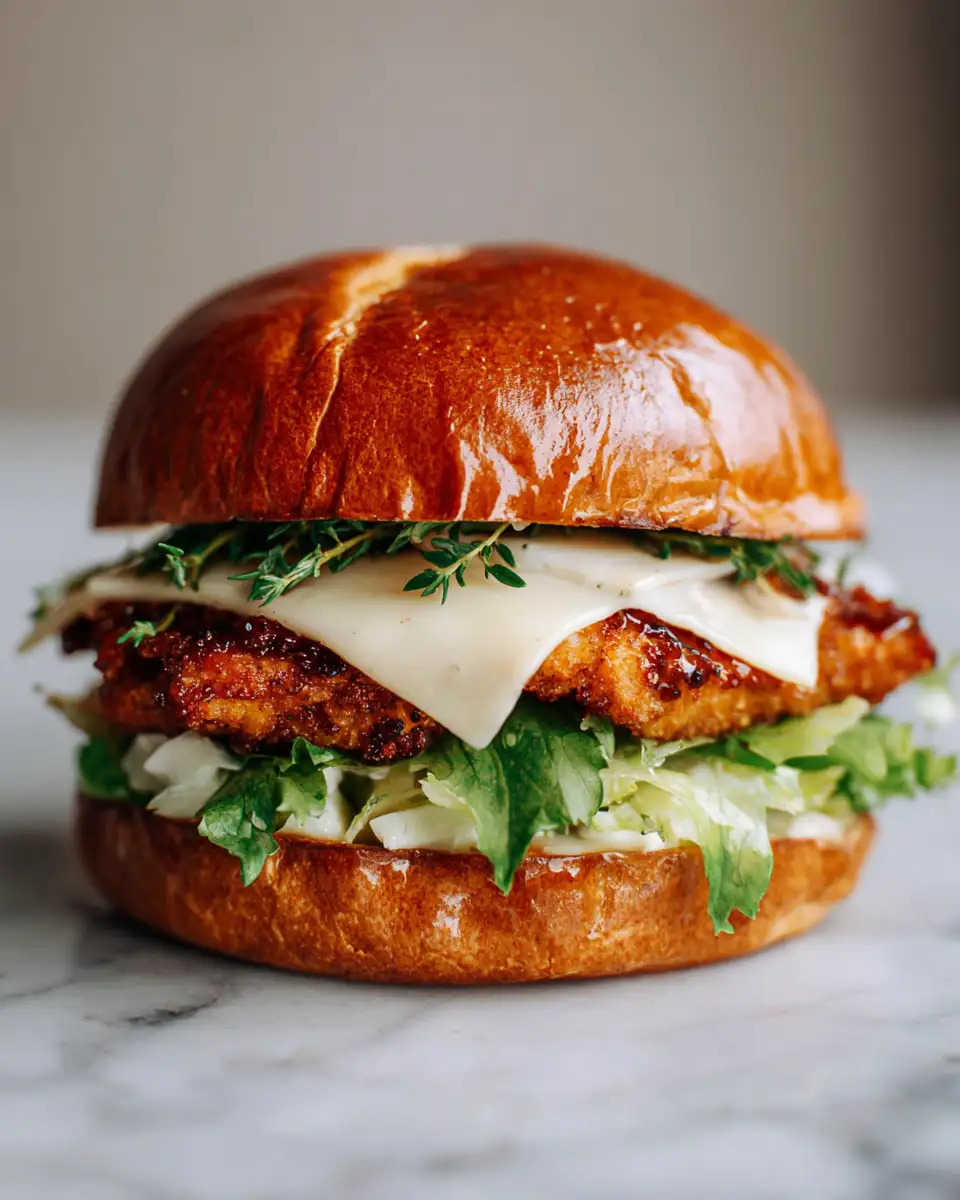
There’s something irresistibly comforting about biting into The Best Crispy Chicken Caesar Sandwich—a perfect harmony of crunchy, creamy, and savory that brings back memories of lazy Sunday afternoons with my sister Ouma and the warm kitchen of Mama Lou. I still remember how Mama Lou would gather us around the table, her hands expertly crafting simple meals that felt like a warm hug. This sandwich takes me right back to those moments: golden, crispy chicken layered with tangy Caesar dressing, fresh romaine, and a sprinkle of Parmesan, all nestled between toasted artisan bread. It’s hearty, satisfying, and wrapped in a little bit of love that I hope to share with you today.
Table of Contents
Why You’ll Love This The Best Crispy Chicken Caesar Sandwich
What makes this The Best Crispy Chicken Caesar Sandwich isn’t just the ingredients—it’s the way they come together to create a melody of textures and flavors that dance on your palate. The crispy chicken, with its perfectly seasoned crust, contrasts beautifully against the crisp romaine and creamy Caesar dressing, making every bite a delightful experience. This sandwich is a testament to how simple ingredients, when treated with care and a bit of soul, can turn into something extraordinary.
Growing up, Mama Lou never rushed her cooking. She believed meals were moments to cherish, and that’s exactly what this sandwich embodies for me. It’s easy enough for a weeknight dinner but special enough to serve when family gathers. It’s versatile, too—you can dress it up with homemade bread or keep it casual with store-bought favorites. When Ouma and I make this together now, it feels like carrying forward a beautiful tradition, connecting us to Mama Lou’s kitchen, and to each other.
Ingredients You’ll Need for This The Best Crispy Chicken Caesar Sandwich

- 2 boneless, skinless chicken breasts (about 6 ounces each)
- 1 cup buttermilk (or substitute with 1 cup milk + 1 tablespoon lemon juice, let sit 5 minutes)
- 1 cup all-purpose flour
- 1 teaspoon garlic powder
- 1 teaspoon onion powder
- 1 teaspoon smoked paprika
- 1/2 teaspoon salt
- 1/2 teaspoon black pepper
- Vegetable oil, for frying (about 2 cups)
- 4 slices rustic artisan bread or ciabatta rolls
- 1 cup romaine lettuce, chopped and crisp
- 1/3 cup Caesar dressing (homemade or store-bought; see tip below)
- 1/4 cup freshly grated Parmesan cheese
- Optional: 2 slices ripe tomato for freshness
If you want to switch things up, you can use panko breadcrumbs mixed with the flour for an even crunchier coating. For a lighter version, try baking the chicken instead of frying, brushing it with olive oil and baking at 425°F for about 20 minutes until golden. And if you’re feeling adventurous, adding a pinch of cayenne to the flour mix gives this sandwich a subtle kick reminiscent of some of Mama Lou’s spicier dishes.
Nutrition Facts
- Calories: Approximately 550 per sandwich
- Protein: 40g
- Fat: 25g
- Carbohydrates: 40g
- Fiber: 3g
- Sugar: 3g
- Sodium: 900mg
These values are based on using traditional frying methods and artisan bread. If you opt for baking or lighter bread options, you can reduce the fat and sodium content. I always recommend pairing this sandwich with a fresh salad or steamed veggies to balance the meal and add some nutritional variety. Learn more: The Ultimate BLT Grilled Cheese Sandwich You Need to Try Today
Print
The Best Crispy Chicken Caesar Sandwich You Need to Try Today
Learn how to make delicious The Best Crispy Chicken Caesar Sandwich. Easy recipe with step-by-step instructions.
- Total Time: 45 minutes
- Yield: 4 servings 1x
Ingredients
- 2 boneless, skinless chicken breasts (about 6 ounces each)
- 1 cup buttermilk (or substitute with 1 cup milk + 1 tablespoon lemon juice, let sit 5 minutes)
- 1 cup all-purpose flour
- 1 teaspoon garlic powder
- 1 teaspoon onion powder
- 1 teaspoon smoked paprika
- 1/2 teaspoon salt
- 1/2 teaspoon black pepper
- Vegetable oil, for frying (about 2 cups)
- 4 slices rustic artisan bread or ciabatta rolls
- 1 cup romaine lettuce, chopped and crisp
- 1/3 cup Caesar dressing (homemade or store-bought; see tip below)
- 1/4 cup freshly grated Parmesan cheese
- Optional: 2 slices ripe tomato for freshness
If you want to switch things up, you can use panko breadcrumbs mixed with the flour for an even crunchier coating. For a lighter version, try baking the chicken instead of frying, brushing it with olive oil and baking at 425°F for about 20 minutes until golden. And if you’re feeling adventurous, adding a pinch of cayenne to the flour mix gives this sandwich a subtle kick reminiscent of some of Mama Lou’s spicier dishes.
Instructions
- Place the chicken breasts between two sheets of plastic wrap or parchment paper. Use a meat mallet or rolling pin to gently pound them to an even thickness, about 1/2 inch thick. This helps them cook evenly and stay juicy—something Mama Lou always insisted on.
- Pour the buttermilk into a shallow bowl. Add a pinch of salt and pepper, then submerge the chicken breasts. Cover and refrigerate for at least 30 minutes, or up to 2 hours. This tenderizes the meat and adds flavor.
- In another shallow dish, combine the flour, garlic powder, onion powder, smoked paprika, salt, and black pepper. Mix well.
- Heat about 1 inch of vegetable oil in a large skillet over medium-high heat until it reaches 350°F (or use the classic bread cube test—if it browns in 60 seconds, the oil is ready).
- Remove the chicken from the buttermilk, letting excess drip off. Dredge each piece thoroughly in the flour mixture, pressing lightly to coat evenly.
- Carefully place the chicken into the hot oil. Fry for about 4-5 minutes per side, or until golden brown and the internal temperature reaches 165°F. Avoid overcrowding the pan; cook in batches if necessary. I remember Ouma’s nervous excitement watching the chicken sizzle, a sound that always meant something wonderful was coming.
- Transfer the fried chicken to a wire rack or paper towel-lined plate to drain excess oil.
- Toast the bread slices or rolls until golden and slightly crisp. This adds a lovely crunch and prevents sogginess from the dressing.
- Spread a generous layer of Caesar dressing on the bottom slice of bread. Top with the crispy chicken, then a handful of chopped romaine, a sprinkle of Parmesan, and tomato slices if using.
- Finish with the top slice of bread, press gently, and slice the sandwich in half for easier handling. Serve immediately.
“The secret to a great sandwich isn’t just the ingredients—it’s the love you put into every step.” — Mama Lou’s timeless wisdom
- Prep Time: 15 minutes
- Cook Time: 30 minutes
- Category: Main Dish
- Method: Cooking
- Cuisine: International
Steps to Create Your The Best Crispy Chicken Caesar Sandwich
- Place the chicken breasts between two sheets of plastic wrap or parchment paper. Use a meat mallet or rolling pin to gently pound them to an even thickness, about 1/2 inch thick. This helps them cook evenly and stay juicy—something Mama Lou always insisted on.
- Pour the buttermilk into a shallow bowl. Add a pinch of salt and pepper, then submerge the chicken breasts. Cover and refrigerate for at least 30 minutes, or up to 2 hours. This tenderizes the meat and adds flavor.
- In another shallow dish, combine the flour, garlic powder, onion powder, smoked paprika, salt, and black pepper. Mix well.
- Heat about 1 inch of vegetable oil in a large skillet over medium-high heat until it reaches 350°F (or use the classic bread cube test—if it browns in 60 seconds, the oil is ready).
- Remove the chicken from the buttermilk, letting excess drip off. Dredge each piece thoroughly in the flour mixture, pressing lightly to coat evenly.
- Carefully place the chicken into the hot oil. Fry for about 4-5 minutes per side, or until golden brown and the internal temperature reaches 165°F. Avoid overcrowding the pan; cook in batches if necessary. I remember Ouma’s nervous excitement watching the chicken sizzle, a sound that always meant something wonderful was coming.
- Transfer the fried chicken to a wire rack or paper towel-lined plate to drain excess oil.
- Toast the bread slices or rolls until golden and slightly crisp. This adds a lovely crunch and prevents sogginess from the dressing.
- Spread a generous layer of Caesar dressing on the bottom slice of bread. Top with the crispy chicken, then a handful of chopped romaine, a sprinkle of Parmesan, and tomato slices if using.
- Finish with the top slice of bread, press gently, and slice the sandwich in half for easier handling. Serve immediately.
“The secret to a great sandwich isn’t just the ingredients—it’s the love you put into every step.” — Mama Lou’s timeless wisdom
Tips for Making the Best The Best Crispy Chicken Caesar Sandwich
One of my favorite memories is how Mama Lou emphasized the importance of texture. She’d say, “Crisp on the outside, tender on the inside—that’s the soul of good chicken.” Here are some tips to capture that magic:
- Marinate Properly: Don’t skip the buttermilk soak. It tenderizes and adds moisture, keeping the chicken juicy beneath the crispy crust.
- Don’t Overcrowd the Pan: Frying too many pieces at once drops the oil temperature and results in soggy chicken. Patience here pays off.
- Use a Thermometer: Check that the chicken reaches 165°F internally for safe and perfectly cooked meat.
- Make Your Own Caesar Dressing: If you have time, homemade dressing with fresh garlic, anchovies, lemon juice, Dijon, and Parmesan can elevate the sandwich to new heights. Mama Lou swore by making her own—it’s worth the effort.
- Choose Crisp Bread: A sturdy bread like ciabatta or sourdough holds up well to the moist ingredients without falling apart.
- Add Freshness: Don’t underestimate the crunch of fresh romaine and the brightness of a squeeze of lemon on top before serving.
Serving Suggestions and Pairings

This sandwich shines on its own, but pairing it thoughtfully can turn your meal into a celebration. When Ouma and I serve this, we love to keep things simple and fresh, just like Mama Lou taught us.
- A crisp side salad with cherry tomatoes, cucumbers, and a light vinaigrette balances the richness of the sandwich.
- Classic French fries or sweet potato fries add a nostalgic touch, reminiscent of those family dinners where sides were just as important as the main.
- A cold glass of iced tea or sparkling water with lemon complements the savory flavors perfectly.
- For a heartier meal, roasted vegetables or a bowl of tomato soup bring warmth and comfort alongside.
Storage and Reheating Tips
I always encourage cooking with care so leftovers don’t feel like a chore. If you have any leftover chicken or sandwiches, here are my tips to keep that crispiness alive:
- Store leftover chicken separately from the bread and lettuce to avoid sogginess. Wrap the chicken in foil or place it in an airtight container in the refrigerator for up to 2 days.
- When reheating the chicken, use an oven or air fryer set to 375°F for about 8-10 minutes to refresh the crust without drying the meat.
- Re-toast the bread lightly if needed, and add fresh lettuce and dressing just before serving.
- Avoid microwaving the sandwich whole—it tends to make the crust soggy and the bread chewy.
Frequently Asked Questions
What are the main ingredients for The Best Crispy Chicken Caesar Sandwich?
The main ingredients for The Best Crispy Chicken Caesar Sandwich include the items listed in our ingredients section above. Each ingredient plays a crucial role in achieving the perfect flavor and texture.
How long does it take to make The Best Crispy Chicken Caesar Sandwich?
The total time to make The Best Crispy Chicken Caesar Sandwich includes both preparation and cooking time. Check the recipe card above for exact timing details.
Can I make The Best Crispy Chicken Caesar Sandwich ahead of time?
Yes, The Best Crispy Chicken Caesar Sandwich can often be prepared in advance. Store it properly in an airtight container in the refrigerator and consume within the recommended timeframe.
What can I serve with The Best Crispy Chicken Caesar Sandwich?
The Best Crispy Chicken Caesar Sandwich pairs well with various sides and accompaniments. Consider the serving suggestions mentioned in the recipe for the best dining experience.
Is The Best Crispy Chicken Caesar Sandwich suitable for special diets?
Depending on the ingredients used, The Best Crispy Chicken Caesar Sandwich may be adapted for various dietary needs. Check the ingredients list and consider substitutions as needed for your dietary requirements.
Final Thoughts
Making The Best Crispy Chicken Caesar Sandwich brings me back to the heart of family—the kitchen where Mama Lou’s hands shaped our love for food and each other. Every crispy bite carries her legacy, the laughter Ouma and I shared in those warm afternoons, and the simple joy of sharing a meal made with intention. This sandwich is more than just a recipe; it’s a story, a tradition, and a delicious embrace.
I hope as you make this sandwich, you’ll feel that same warmth and connection, whether you’re feeding your family or treating yourself to a special lunch. Remember, the best food is always made with love—just like Mama Lou’s.


