

Every time I prepare Arepas con Queso, I am transported back to the sun-drenched afternoons spent in Mama Lou’s kitchen, where the air was thick with warmth and the comforting scent of corn masa. Those were the days when my sister Ouma and I would eagerly watch Mama Lou’s skilled hands transform simple ingredients into something magical. Arepas con Queso holds a special place in my heart, not just as a delightful dish but as a cherished family tradition that binds us together through generations. In this article, I’ll share with you how to make these delectable corn cakes, enriched with cheese and love, just as Mama Lou taught me.
Table of Contents
Why You’ll Love This Arepas con Queso
Arepas con Queso are more than just a meal; they’re a hug on a plate, filled with nostalgia and warmth. You’ll love them for their simplicity and versatility. Whether you’re enjoying them at breakfast with a cup of coffee or as a comforting dinner side, their crispy exterior and cheesy, tender interior make them irresistible. They’re also incredibly customizable. You can fill them with your favorite ingredients or enjoy them plain. For me, biting into an arepa brings back memories of shared laughter with Ouma and the comforting presence of Mama Lou.
Ingredients You’ll Need for This Arepas con Queso

- 2 cups pre-cooked cornmeal (masarepa)
- 2 cups warm water
- 1 cup shredded mozzarella cheese
- 1/2 cup crumbled queso fresco
- 1 teaspoon salt
- 2 tablespoons unsalted butter, for cooking
If you don’t have queso fresco on hand, you can substitute it with feta cheese for a similar tangy flavor. For a twist, try adding a pinch of cumin or chopped fresh herbs to the dough.
Nutrition Facts
- Calories: 310 per serving
- Protein: 10g
- Fat: 12g
- Carbohydrates: 40g
- Fiber: 4g
- Sugar: 1g
- Sodium: 400mg

Sizzling Arepas con Queso: A Taste of Latin Comfort
Learn how to make delicious Arepas con Queso. Easy recipe with step-by-step instructions.
- Total Time: 45 minutes
- Yield: 4 servings 1x
Ingredients
- 2 cups pre-cooked cornmeal (masarepa)
- 2 cups warm water
- 1 cup shredded mozzarella cheese
- 1/2 cup crumbled queso fresco
- 1 teaspoon salt
- 2 tablespoons unsalted butter, for cooking
If you don’t have queso fresco on hand, you can substitute it with feta cheese for a similar tangy flavor. For a twist, try adding a pinch of cumin or chopped fresh herbs to the dough.
Instructions
- In a large mixing bowl, combine the pre-cooked cornmeal and salt. Gradually add the warm water, mixing with your hands until a dough forms. The dough should be smooth and free of lumps.
- Fold in the shredded mozzarella and crumbled queso fresco, kneading the dough until the cheese is evenly distributed.
- Divide the dough into 8 equal portions and shape each into a ball. Flatten each ball into a disc about 1/2 inch thick.
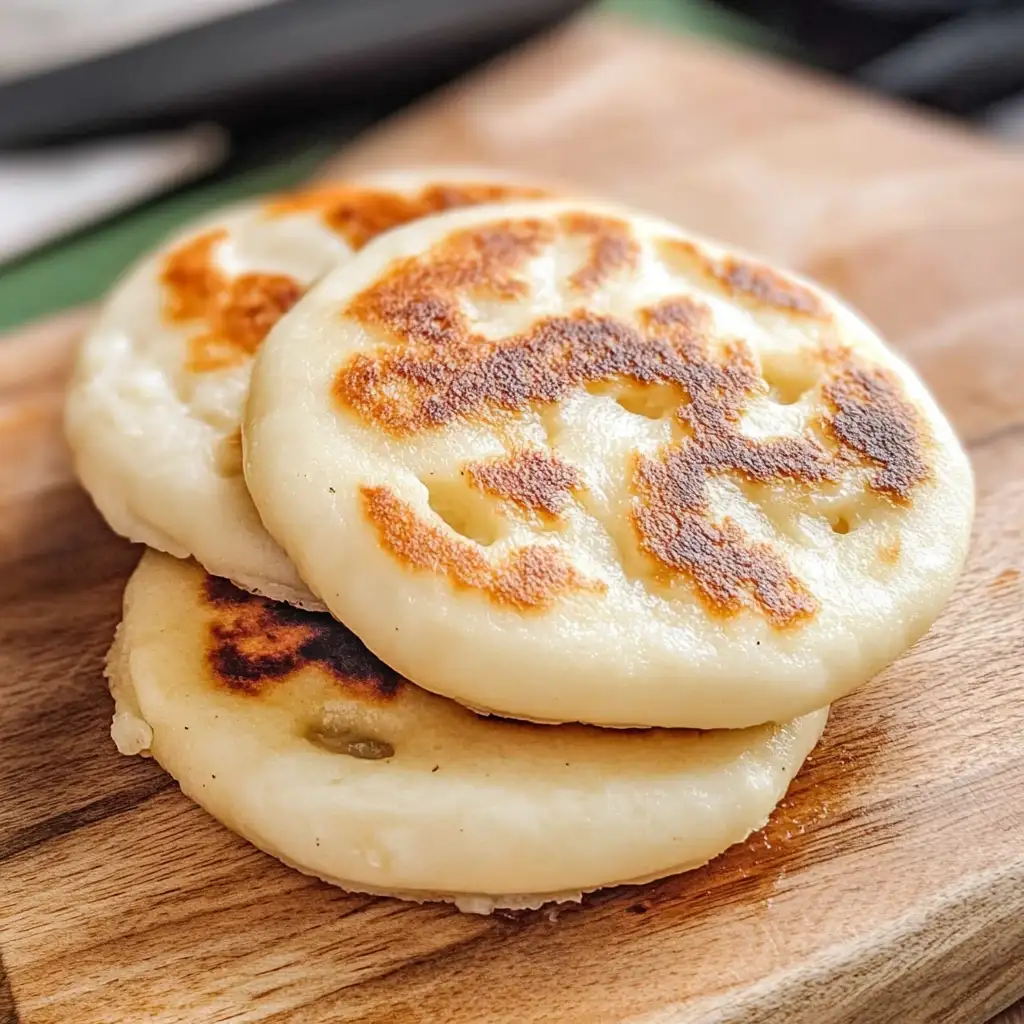
- Heat a non-stick skillet over medium heat and melt a tablespoon of butter. Add the arepas and cook for about 5-7 minutes on each side or until they develop a golden-brown crust.
- Once cooked, transfer the arepas to a plate lined with paper towels to absorb any excess butter. Serve them warm.
Cooking these arepas always brings me back to the first time I attempted them on my own. Mama Lou stood by my side, her gentle guidance ensuring I didn’t burn them, and Ouma cheered on my every move. Remember, the key is patience. Let them cook thoroughly to get that perfect crispy texture!
- Prep Time: 15 minutes
- Cook Time: 30 minutes
- Category: Main Dish
- Method: Cooking
- Cuisine: International
Steps to Create Your Arepas con Queso
- In a large mixing bowl, combine the pre-cooked cornmeal and salt. Gradually add the warm water, mixing with your hands until a dough forms. The dough should be smooth and free of lumps.
- Fold in the shredded mozzarella and crumbled queso fresco, kneading the dough until the cheese is evenly distributed.
- Divide the dough into 8 equal portions and shape each into a ball. Flatten each ball into a disc about 1/2 inch thick.
- Heat a non-stick skillet over medium heat and melt a tablespoon of butter. Add the arepas and cook for about 5-7 minutes on each side or until they develop a golden-brown crust.
- Once cooked, transfer the arepas to a plate lined with paper towels to absorb any excess butter. Serve them warm.
Cooking these arepas always brings me back to the first time I attempted them on my own. Mama Lou stood by my side, her gentle guidance ensuring I didn’t burn them, and Ouma cheered on my every move. Remember, the key is patience. Let them cook thoroughly to get that perfect crispy texture!
Tips for Making the Best Arepas con Queso
Here are a few tips to ensure your Arepas con Queso turn out perfect every time:
- Use warm water: It helps the dough come together smoothly.
- Don’t rush the cooking process: Allow the arepas to develop a deep golden crust for the best texture.
- Adjust seasoning to taste: Depending on your cheese choice, you might need more or less salt.
- Experiment with fillings: While cheese is classic, you can add shredded chicken, beef, or even vegetables.
Serving Suggestions and Pairings

Arepas con Queso are incredibly versatile. Serve them with a dollop of sour cream or guacamole for added richness. They pair beautifully with a light salad or a hearty bowl of soup. In our family, we often enjoyed them as a side to our main meals or stuffed them with scrambled eggs for breakfast. Mama Lou always said that an arepa’s best companion is a shared table.
Storage and Reheating Tips
If you have leftovers (a rare occurrence in our house!), store them in an airtight container in the refrigerator for up to three days. To reheat, place them in a hot skillet for a few minutes on each side until warmed through and crispy again. Avoid microwaving as they tend to become soft and lose their delightful crunch.
Frequently Asked Questions
What are the main ingredients for Arepas con Queso?
The main ingredients for Arepas con Queso include the items listed in our ingredients section above. Each ingredient plays a crucial role in achieving the perfect flavor and texture.
How long does it take to make Arepas con Queso?
The total time to make Arepas con Queso includes both preparation and cooking time. Check the recipe card above for exact timing details.
Can I make Arepas con Queso ahead of time?
Yes, Arepas con Queso can often be prepared in advance. Store it properly in an airtight container in the refrigerator and consume within the recommended timeframe.
What can I serve with Arepas con Queso?
Arepas con Queso pairs well with various sides and accompaniments. Consider the serving suggestions mentioned in the recipe for the best dining experience.
Is Arepas con Queso suitable for special diets?
Depending on the ingredients used, Arepas con Queso may be adapted for various dietary needs. Check the ingredients list and consider substitutions as needed for your dietary requirements.
Final Thoughts
Making Arepas con Queso is more than a culinary exercise; it’s a journey into my family’s heart. From Mama Lou’s kitchen to yours, I hope you find as much joy in creating and sharing these little treasures as I have. They’re a testament to the power of simple ingredients and the warmth of family traditions. Every bite is a reminder of the love and memories woven into each arepa. Happy cooking!